Common WED Workflows for Newbies
NOTE
This section of the manual is provided to new WED authors for situational awareness only, and simply gives a high-level description of the most common types of goals authors have when using WED, so that you might have a general idea of the workflows required as you begin to learn WED. More detailed and specialized authoring techniques in WED is covered elsewhere in the GUI Tool reference and Workflows sections of this manual, which you should browse to become familiar with the topics available.
New Scratch Airport
Its very rare for authors to create a new airport from scratch, as X-Plane already has a large database of airports in the sim, and when we say new airport, we mean an airport that have no code and does not exist in X-Plane at all. We do not mean "new airport scenery created from scratch to replace existing airport scenery". If you want to create an airport from scratch that replaces an existing one (in X-Plane's database), then that falls under the category of modifying airports which is described more below.
Creating a new airport is straightforward using the available WED tools and menus. You create your airport and airport elements and simply export out the custom overlay scenery package. This would be the way to go if you wanted to build your own private airport for your own use. New airports from scratch are not suitable for sharing on the X-Plane Gateway. To share this type of scenery with others, you simply zip up your custom scenery package and give it to others directly.
Pure Gateway Airports
A Pure Gateway airport is an existing airport that only utilizes reusable and generic elements from Laminar's Official Scenery Library that is included with X-Plane. Many folks commonly liken these generic elements to Lego® pieces and you may see some folks refer to Pure Gateway airports as Lego® Airports. These type of airports do not have any one-off custom 3D elements like a specific style of Control Tower. All elements making up the airport are generic pieces made available through Laminar's library of scenery elements that are included with X-Plane. 99% of X-Plane airports are Pure Gateway airports and the type most users modify. Laminar are constantly adding new scenery elements and 3D object to enhance these types of airports.
To Modify a Pure Gateway airport with WED, you will first create a New Scenery Package and import the airport elements from the Gateway into your empty scenery using a WED command. During the import process, you select an airport code to import and WED will give you a list of all the available versions of the airport that are contained on the Gateway (see image below). The version that currently ships with X-Plane is the version with a status label of Recommended. Other works/versions of the airport by multiple authors are; however, still stored on the Gateway and listed as well. Airports tend to evolve over time and frequently by multiple contributors, which is why more than one version of an airport exists on the Gateway. It is a history of its development over time. Note that you can, in fact, select and import multiple versions at the same time! When you are ready, the X-Plane Gateway Portal has all the information you need about how to submit your work to the Gateway.
To recap, the distinguishing characteristic of a Pure Gateway airport is that ALL of the graphic assets that are used to build the scenery are already included with X-Plane. No graphic scenery assets are contained on, imported from, nor exported to the Gateway Portal at all for these airport types. This is why Pure Gateway airports are not considered a Custom Scenery Overlay Package and require no folder in the Custom Scenery folder. This is in contrast to the Custom Hybrid airports described next.
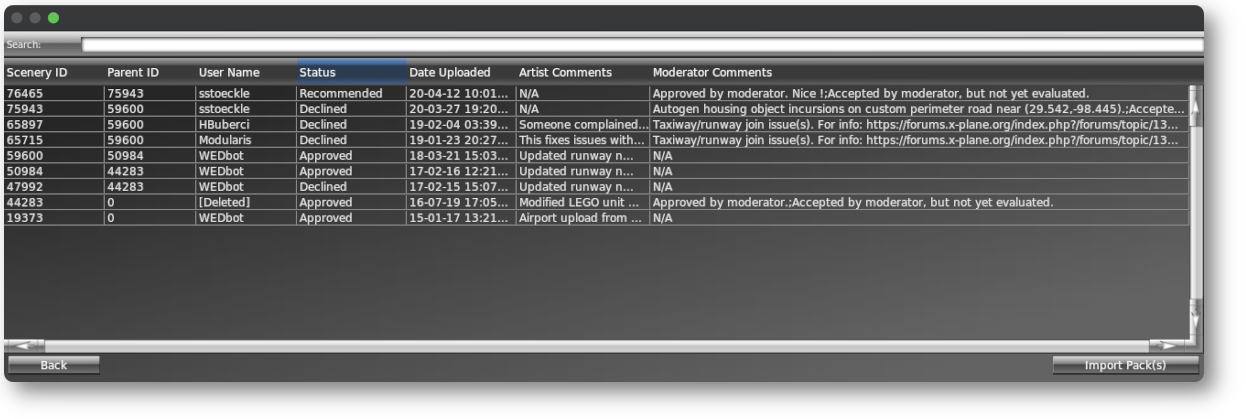
Gateway Airport listing of all available versions of the airport
NOTE
We should note here than while you are editing a Pure Gateway airport, then your ongoing work is technically "custom" while you are actively editing it. As such, your WED XML file and some associated data files will be contained in a Custom Scenery Package folder while you edit it. This allows your version to override the current default version of the airport which normally loads with X-Plane. You can simply remove your custom scenery folder to have X-Plane load its version of the airport. If you push your custom work to the Gateway and it gets accepted as the new default airport distributed with X-Plane, then others will not have a custom scenery folder for your work. A valid custom scenery folder simply tells X-Plane, "load this scenery instead of the default".
Custom Hybrid Airports
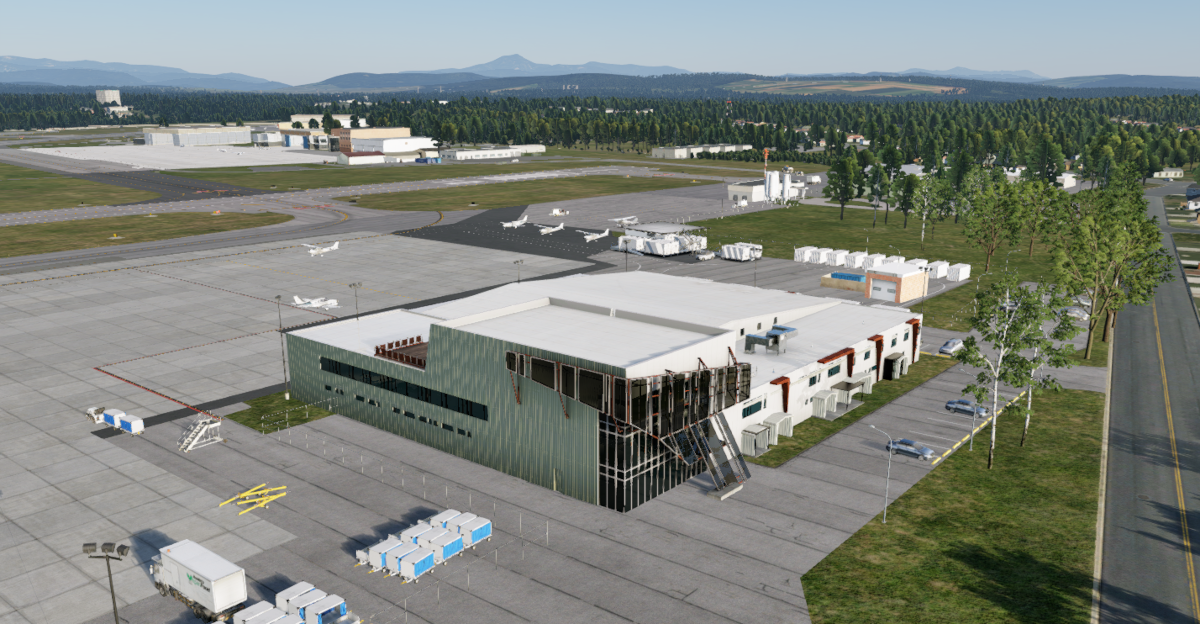
A Custom Hybrid airport is one that contains mostly reusable library elements the same as Pure Gateway Airports do, but will also contain a few one-off custom 3D elements that are visually unique, e.g. the KLAX control Tower, or Custom Hangars. The image below shows the custom office Hangar of BETA Technologies, maker of the ALIA eVTOL aircraft. It is a one-off 3D object made with Blender 3D and exported for X-Plane with Laminar's Blender exporter, placed in the KBTV airport scenery with WED and surrounded by default Library scenery elements.
Click to Enlarge
Laminar develops and maintains its own set of Custom Hybrid Airports and ships them with X-Plane. The Hybrid scenery packages listed below are exclusive to Laminar as their official author, and while you CAN import these generic airport elements from the Gateway, you will not receive any of the custom 3D elements. So for example, if you imported KBTV, you would not download/receive the 3D office hanger shown above, only the default library elements.
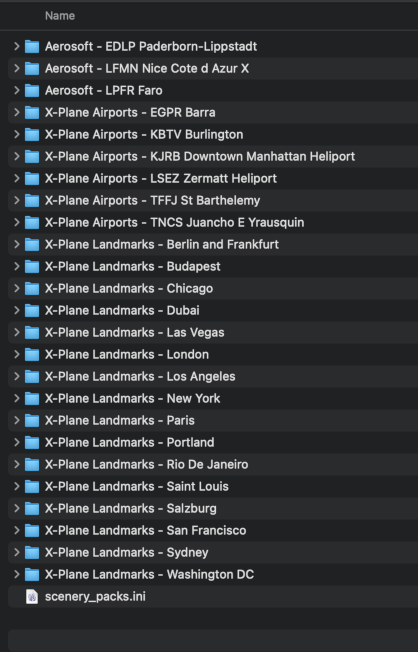
Also, you can not submit any work you do on these airports to the Gateway. When on the Gateway Portal, you will see an Exclude Submission label that let you know these airports are exclusive to Laminar (see KATL example). These custom hybrid airport scenery packages are found in X-Plane's custom scenery folder. The image below shows these scenery package folders inside X-Plane's Custom Scenery folder, with their names prefixed accordingly to let folks know they're owned by Laminar (and some by Aerosoft).
You can make your own Hybrid Airports easily with WED, just as Laminar does. You would need to make your own custom 3D objects and put them in your own Scenery Package folder alongside X-Plane's Custom Scenery packages. The only real difference is if you want to share you custom hybrid scenery work with others, then you have to zip up your custom scenery package and deploy it through means other than the Gateway, such as on a forum. Hybrid Airports (or any scenery using custom 3D elements) will always need to be a Custom Overlay Scenery Package and contained in its own folder.
Adding Landmarks
A common thing scenery developers want to do is to add Landmarks or distinguishing objects to their scenery like a communication tower, water tower or sports complex. You may note in the image above, X-Plane includes many of these already. These objects are not generally associated with an Airport and are called off-site or off-airport 3D objects. Prominent examples would be the Eiffel Tower, Great Pyramids of Egypt, or perhaps you own house. Landmarks, or any miscellaneous 3D for that matter, are added in the same way any other custom 3D objects are in WED, with the requirement that the custom 3D elements be contained in a Custom Overlay scenery Package folder, even if its only a singe 3D object. To add a landmark, you can expect to simply create a custom scenery package, build your 3D models and use WED to place them and perhaps exclude/delete any auto-generated scenery that might interfere with your landmark placement. (see WED exclusion tools)
Orthophotos
We first breakdown Orthophotos into two more specific types. 1) Ortho-Photos are those orthographic images that must be imported into WED manually and are intended to be exported and seen on the ground in X-Plane. 2) Ortho-Reference images are those orthographic images that can automatically be loaded and viewed in WED through the VIEW menu, as a means to Trace/Draw over as a guide. This section only talks about the first option. See this section and this workflow for more information on using Ortho-Reference images in WED.
Ortho-Photos are frequently used to provide more realistic ground textures in your scenery, rather than auto-generated generic land textures. Orthophotos are distinguished by their pixels being associated with latitude / longitude coordinates and when we say ortho-photos, we mean geo-referenced images like geotiffs. WED is able to read, import and correctly place these type of geo-referenced image files. Orthophotos can be imported into WED as a reference to trace elements on top of (like Ortho-Reference images), but most of the time, they are exported out to X-Plane. When valid orthophotos are imported into WED, they will appear where they are supposed to based on their geo-referenced coordinate meta-data.
Orthophotos in WED Overlay Scenery Packages are generally suitable only for limited areas, such as the immediate area surrounding an airport, a small city landscape, city center, or perhaps simply a golf course. Very large scale orthophoto work is much more complex and performed at a differing level than WED and not described here. Note that you can import non geo-referenced images into WED, place/stretch them visually and then export out those images as orthophotos. This is handy for placing distinct ground-level detail like like tennis courts, sports-fields, etc.
Removing Auto-Gen Scenery
Another common desire for scenery authors is to remove auto-generated scenery that impinges on other visual entities. Perhaps there are some auto-generated trees or houses that are simply not in the correct place or overlap into some of your WED work. WED have tools to exclude X-Plane from placing auto-generated scenery where you specify. See the Excluding Scenery section of this manual for more information.
Cleaning up Roads
X-Plane generates its road network from publicly available data, but also has the difficult task of connecting it all with plausible intersections algorithmically, which is quite challenging and the results are not always ideal. Editing roads is an infrequent, indeed rare, activity and editing roads in WED is a bit of a special activity; however, WED does have mechanisms for editing roads. Technically, Roads are not part of the Overlay scenery system, but there's no denying that WED is a convenient visual feedback tool for editing them, hence why the functionality was included.
If you want to edit roads, you will first create an exclusion zone (with Exclusion pull-down menu set to Road Networks) and then import roads into that exclusion zone in WED. Once the roads are imported, you can edit them and re-export out the work and X-Plane will join your work with the existing road network. You can read more about editing roads in the Workflows > Road Editing section of this manual.
Custom 3D Objects
X-Plane ships with a LOT of 3D objects you can use in your scenery; however, if you want a one-off Custom 3D Object, then those need to be created with a dedicated 3D software modeling application. The official application used by Laminar is Blender 3D; however, other 3D softwares may be used to create the objects. Exporting the objects from your 3D software to X-Plane's OBJ format though, requires a dedicated exporter plugin for that 3d software. Laminar only supports and develops one exporter plugin for Blender 3D and indeed is the only software really used for exporting 3D to X-Plane.