Excluding Scenery Entities
General
NOTE
X-Plane have a Scenery Density slider, which can omit autogen scenery areas when the slider is not set to maximum. This can cause some confusion when you are trying to exclude autogen scenery as you may have omitted autogen areas NOT attributable to your exclusion areas but rather X-Plane's scenery density setting. We recommend you set your scenery slider to maximum whenever you are authoring exclusion zones so you are completely sure of what you are exluding.

Exclusion Areas are areas you define in WED, which tell X-Plane to NOT draw certain types of scenery there, so that you may create your own version of scenery in those areas. Exclusion areas are "virtual bulldozers" of sorts,that clear the ground of scenery entities. Exclusion zones clear autogen scenery and if you are creating a custom scenery package, they will also clear any other custom scenery that have a lesser priority than your own custom scenery.
The image below illustrates the concept, where an autogen area is excluded from drawing 3D objects. How exclusion zones affect autogen scenery are not readily intuitive and there are many nuances and techniques to using them. Be sure to read through this section thoroughly to minimize any confusion or frustrations when using these tools. Again, make sure your World Objects Density slider in X-Plane is set to maximum when authoring these zones.
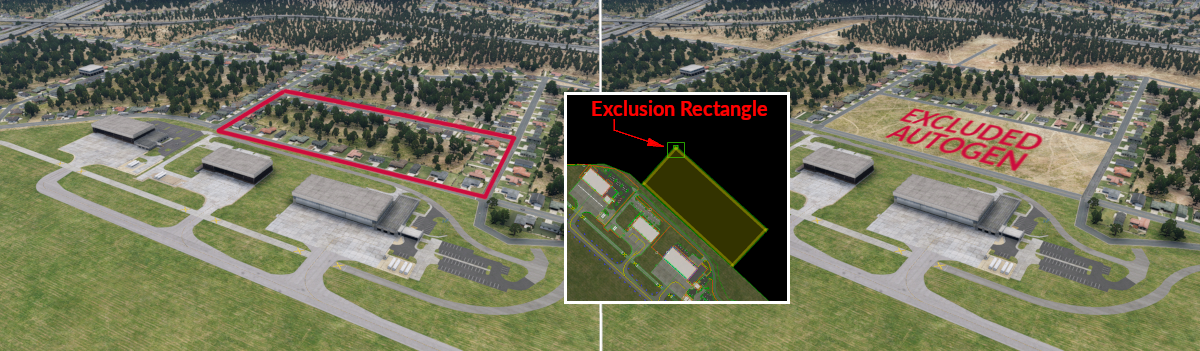
Click to Enlarge
Click to Enlarge (exclusion rectangles)
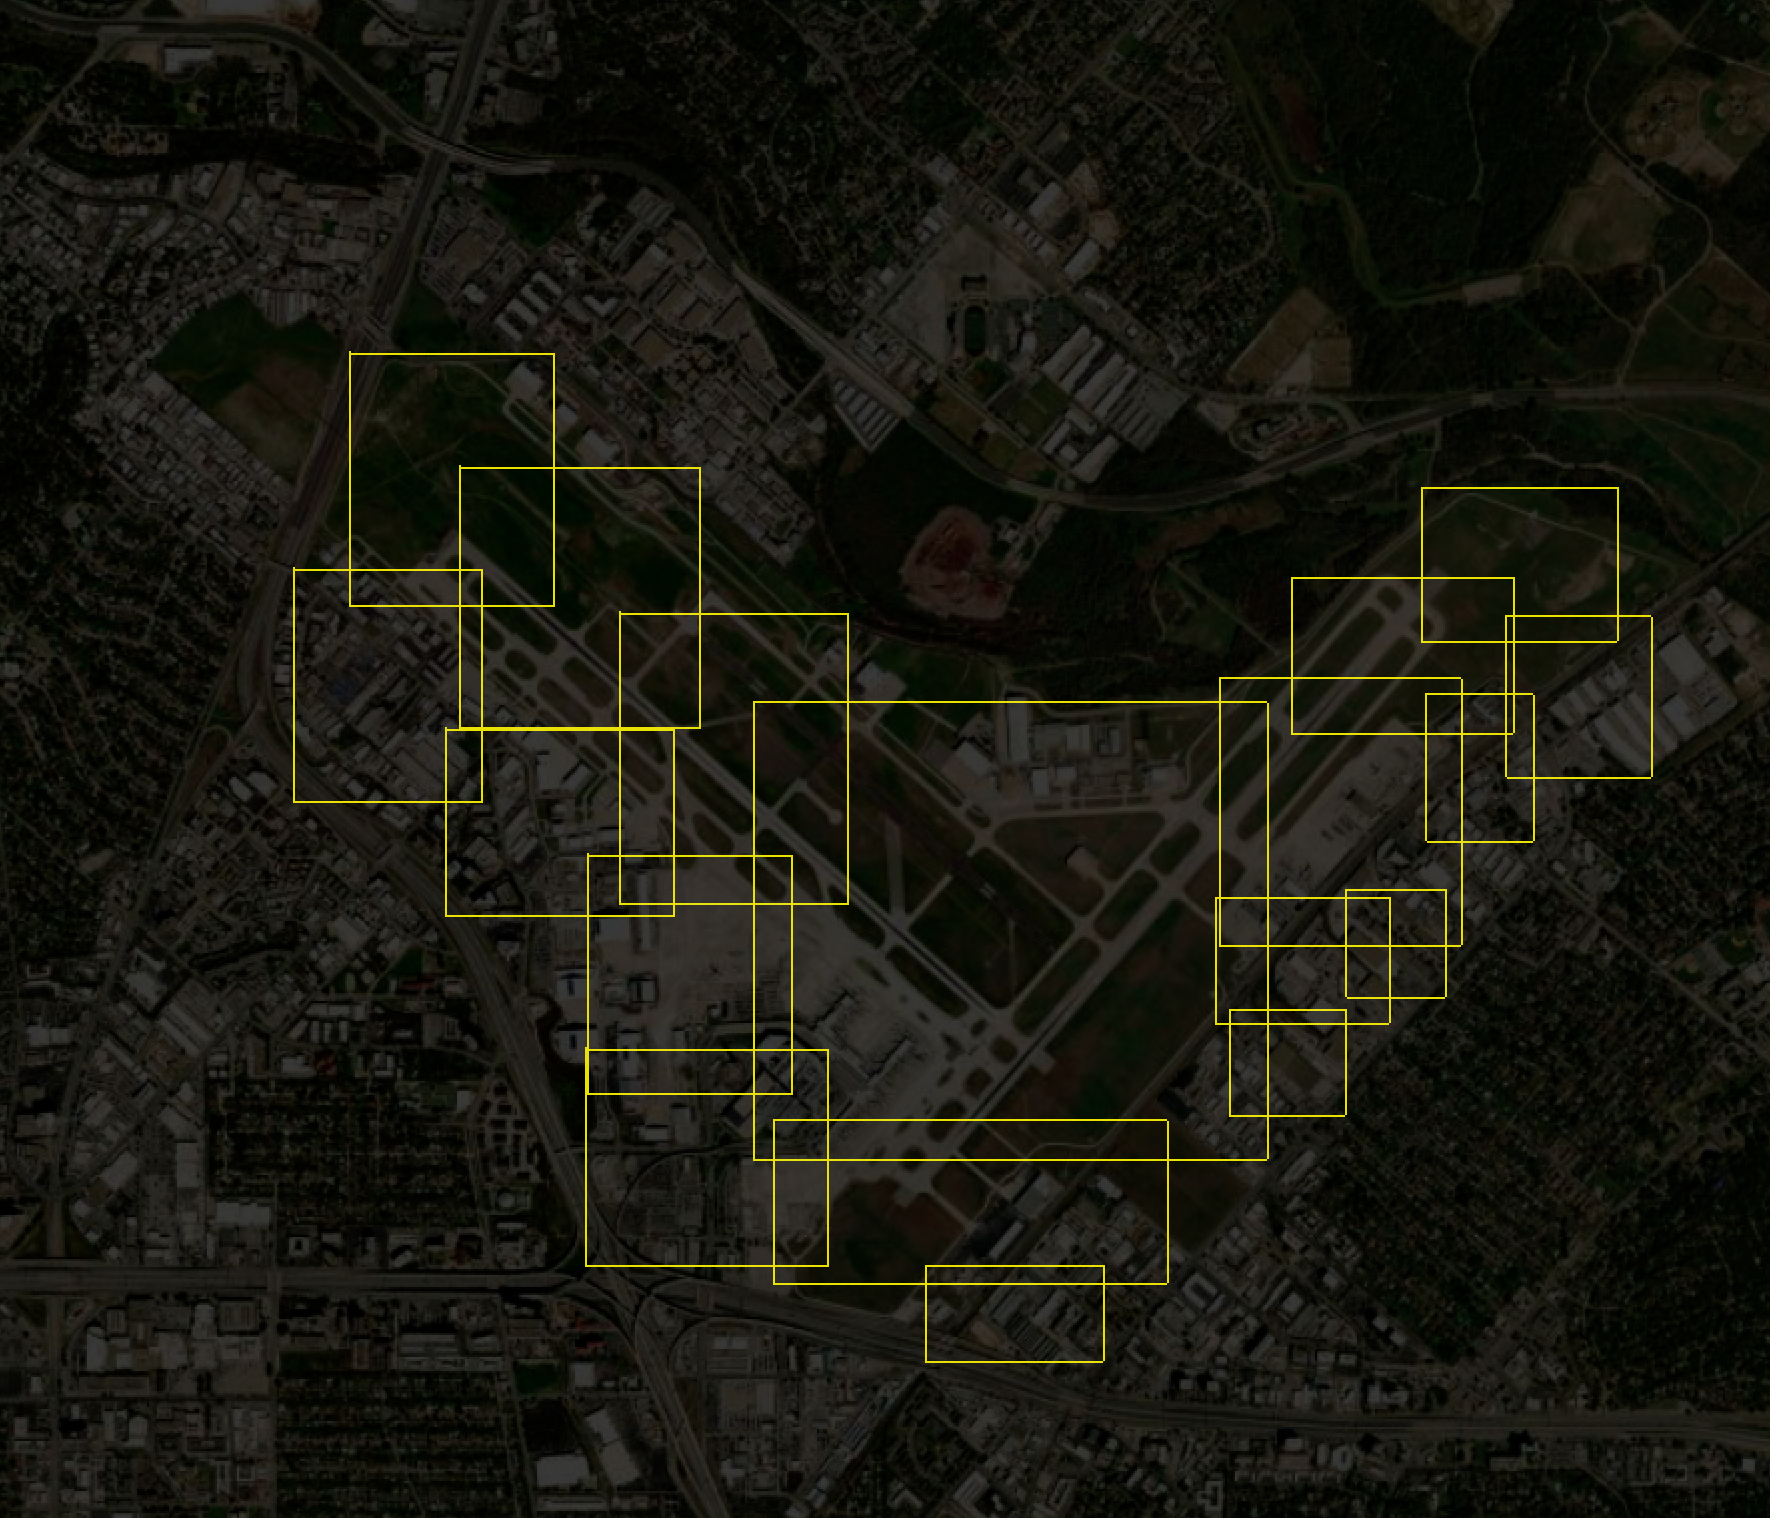
Exclusion zones were originally included in WED so that airport authors could exclude autogen scenery that would otherwise populate on top of their airport in X-Plane. In the early versions of WED, there was only the Rectangle Exclusion shape, which can not be rotated. Users would have to use many rectangles to clear the area around their airport as shown at right. Many airport authors put hundreds and hundreds of these exclusion rectangles in WED to try and approximate the irregular shapes so common to airports. This method was both cumbersome to WED authors and burdensome to X-Plane's scenery algorithms.
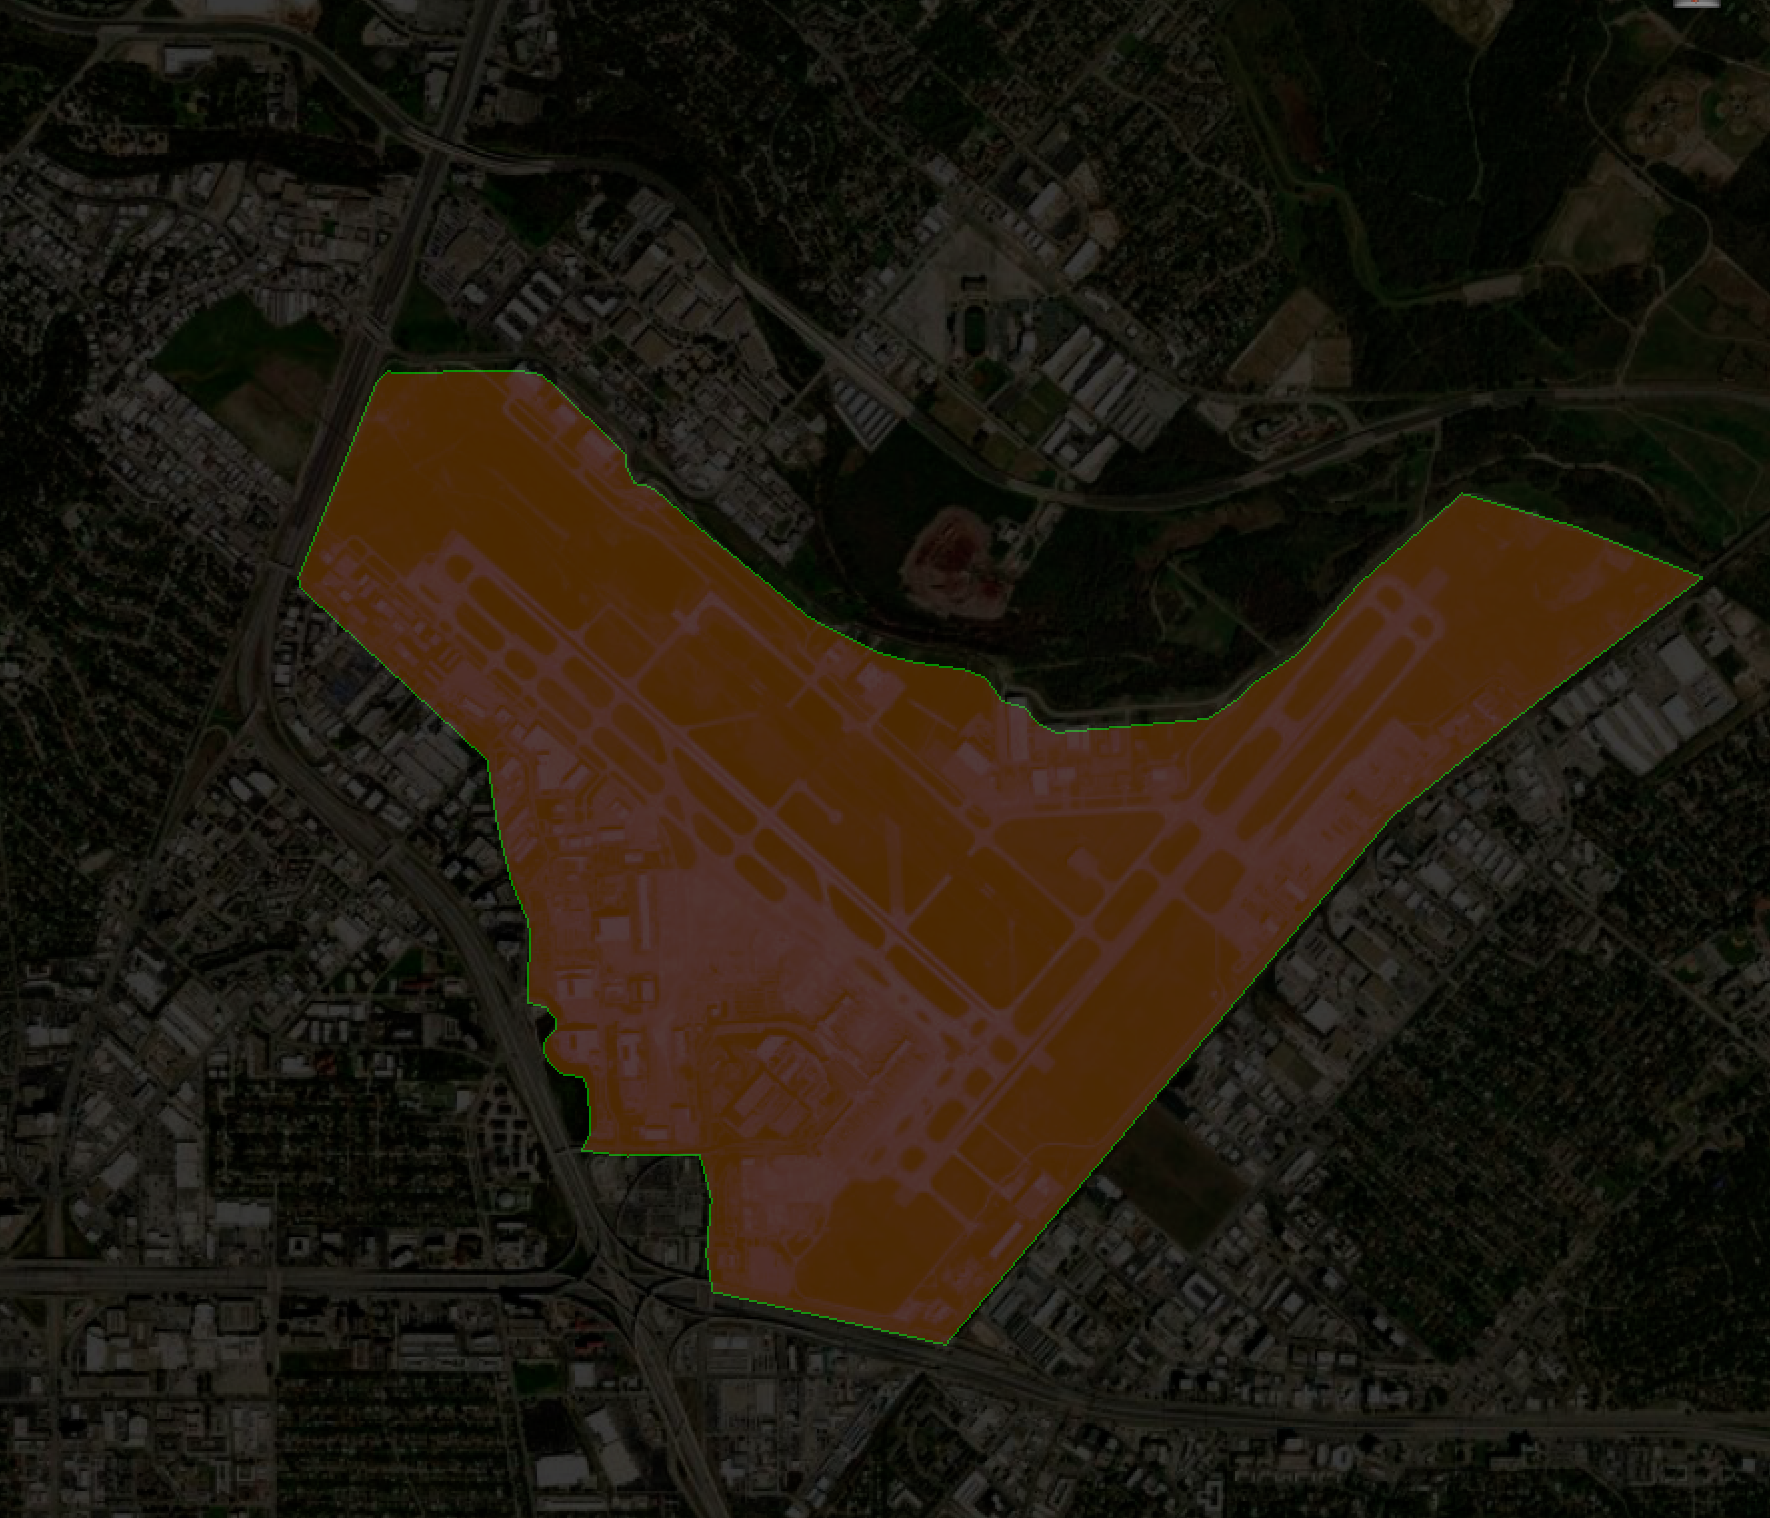
Click to Enlarge (airport boundary)
Later versions of WED use the airport boundary polygon to automatically calculate these rectangle exclusion zones for you, but hide the actual rectangle shapes from the user view, thus an airport boundary as shown at left would effectively exclude all scenery from within its boundary.
If you are only creating airports and not scenery outside the airport boundary, then the airport boundary is usually sufficient and you may not need to use Exclusion zones. Also, if you import older airports from the Gateway, many of them may still have these exclusion rectangles covering the airport area. If these airports have a boundary polygon, you can do everyone a favor and safely remove any exclusion zones within the boundary as they are redundant.
If; however, you are creating some surrounding scenery elements outside the airport boundary, perhaps some noteworthy landmark near the airport, then you will need to use the Exclusion Tools to remove any conflicting scenery entities and "clear the land" for your own scenery, whether your own custom artwork or elements from the Laminar library. Excluding exactly what you want is a bit of an iterative process, with some back and forth between WED and reloading your scenery in X-Plane to check the results. X-Plane have a menu command, Reload Scenery expressely for this purpose. Its common for authors to keep WED and X-Plane open at the same time, exporting the scenery from WED and then reloading it in X-Plane.
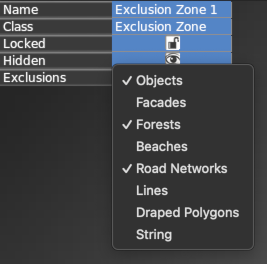
WED's exclusion areas can exclude up to 8 differing types of scenery entities. These types are shown in the image at right. You use a pull down menu to enable which scenery types you want the area to exclude. Scenery types slated for exclusion will be shown with a checkmark next to them. You can enable/disable types by selecting them in the list.
Usually you will want to select an exclusion tool first, then configure the excluded types in the Default Attributes panel before drawing your areas, and finally create all your exclusions with those settings. Once created; however, you can also select an existing exclusion area and then configure that area's exclusion types individually via the attributes pulldown as shown at right.
WARNING
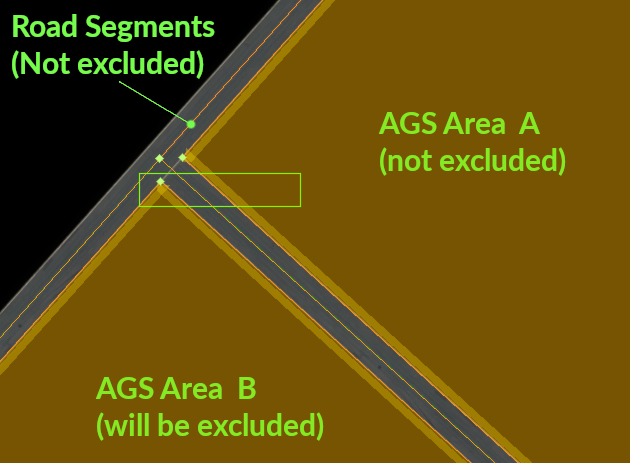
Before we discuss exclusion zones further, we pause and make mention of a very important concept you will need to keep in mind as you work with exclusion areas, and that is both line Segments and Areas are defined by "member points" that make up those segments and areas. These segments and areas are hard coded in X-Plane's DSF scenery files. Exclusion zones do not dynamically "boolean cut" these autogen areas, they only give X-Plane an area to check to see if any autogen elements have any member point that falls within the exclusion area.
We make special mention of this because X-Plane is only aware of segments and areas within an exclusion zone IF one of their member points is within the exclusion zone. When you create exclusion zones, you are not trying to encompass the entire areas and segments themselves within the exclusion, you are trying to capture at least one of their member POINTS!, and it only takes one point to exclude the entire area/segment. Clearly if you encompass the entire area, then the area will be excluded. WED have tools to allow you to import the autogen entities your exclusions zones will be affecting, allowing you to better manage your exclusions. The image below illustrates the concept.
There is one exception to the "exclude a vertex excludes the whole area" paradigm, and that is Forest areas, which is discussed next.
Forest Area Exclusions
Forest areas are the only area type where an exclusion rectangle will exactly remove the shape of the exclusion from the forest area shape similiar to a boolean cut, rather than remove the entire forest area polygon. This is because a forest area is simply a collection of individual tree objects within its interior area, each occupying a single point in space. X-Plane can easily figure out if a single tree point within a forest area is within the exclusion area and remove it. Facade, polygon and autogen area paths, in contrast, have no "interior point elements" within them, only their perimeter verticie points are known to X-Plane, and all are needed to complete those areas.
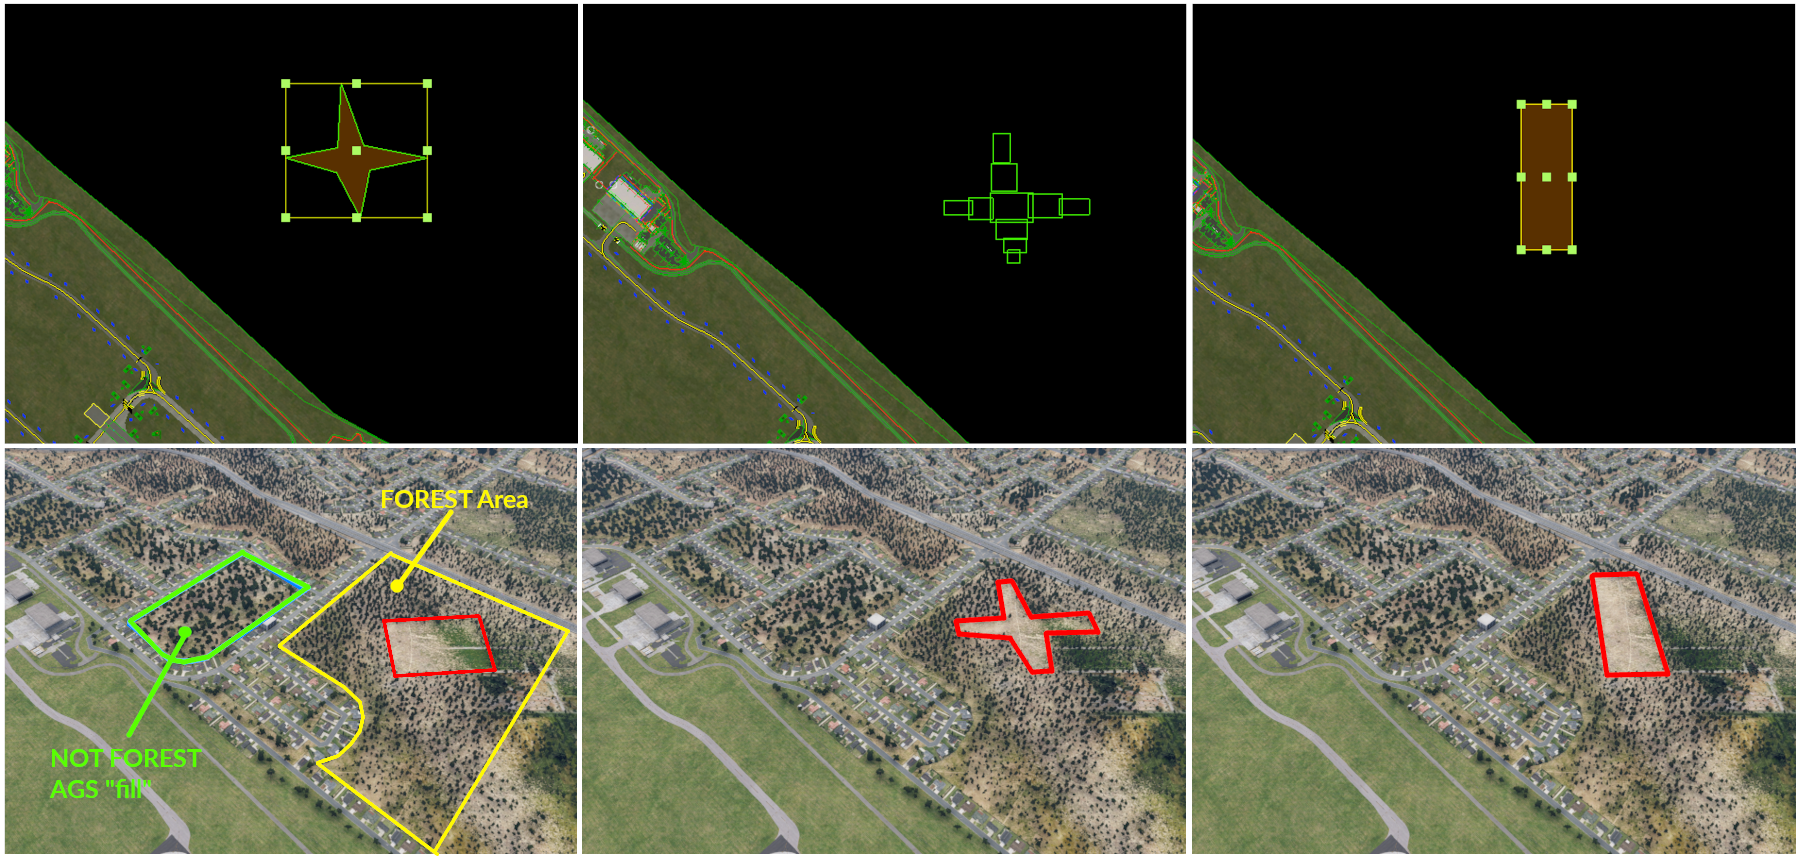
The image below illustrates how forest areas are handled by exclusion zones. First and foremost, not every area of trees are classified as a forest area polygon type in X-Plane's DSF file. In the lower left corner of the image below, you will see that X-Plane will also use fill trees to fill in the area enclosed by a ring of buildings (called an AGS polygon, i.e Auto-Generated String). These areas, while possibly containing many trees are not forest polygons and exclusion zones for forests will not exclude trees in these areas.
In the first example at left, we use the exclusion polygon tool to try and remove a "star pattern" from the forest; however, with this tool, only the bounding box of the polygon is used for the actual exclusion of trees (red box). If you wanted to mimic a star pattern as shown, you would have to use a series of rectangular exclusions to approximate the shape of the star (middle example). Finally, in the rightmost example, a simple exclusion rectangle was used to clip out the trees.
Because exclusion rectangles cannot be rotated, and are always oriented North/South/East/West, then excluding (cutting out) an irregular section of a forest area is typically done as shown in the middle example below, with several small zones.
Click to Enlarge
Importing Autogen Entities
Click to Enlarge
WED allows you to import autogen elements (except forest areas) affected by your Exclusion Zones so you have more control and visual feedback over what you are excluding. Be forewarned that WED will also export back out these same imported autogen elements if they are visible in WED. As such, if you export out an exclusion zone AND its affected autogen elements, then you are changing nothing in X-Plane, i.e. the exclusion zone will remove the scenery, and the WED exported autogen (that you imported) will put it right back. Its quite easy to import autogen into WED and forget to turn off their visibility and then wonder why your exclusion zone appears not to work (but is).
A typical exclusion zone workflow is to:
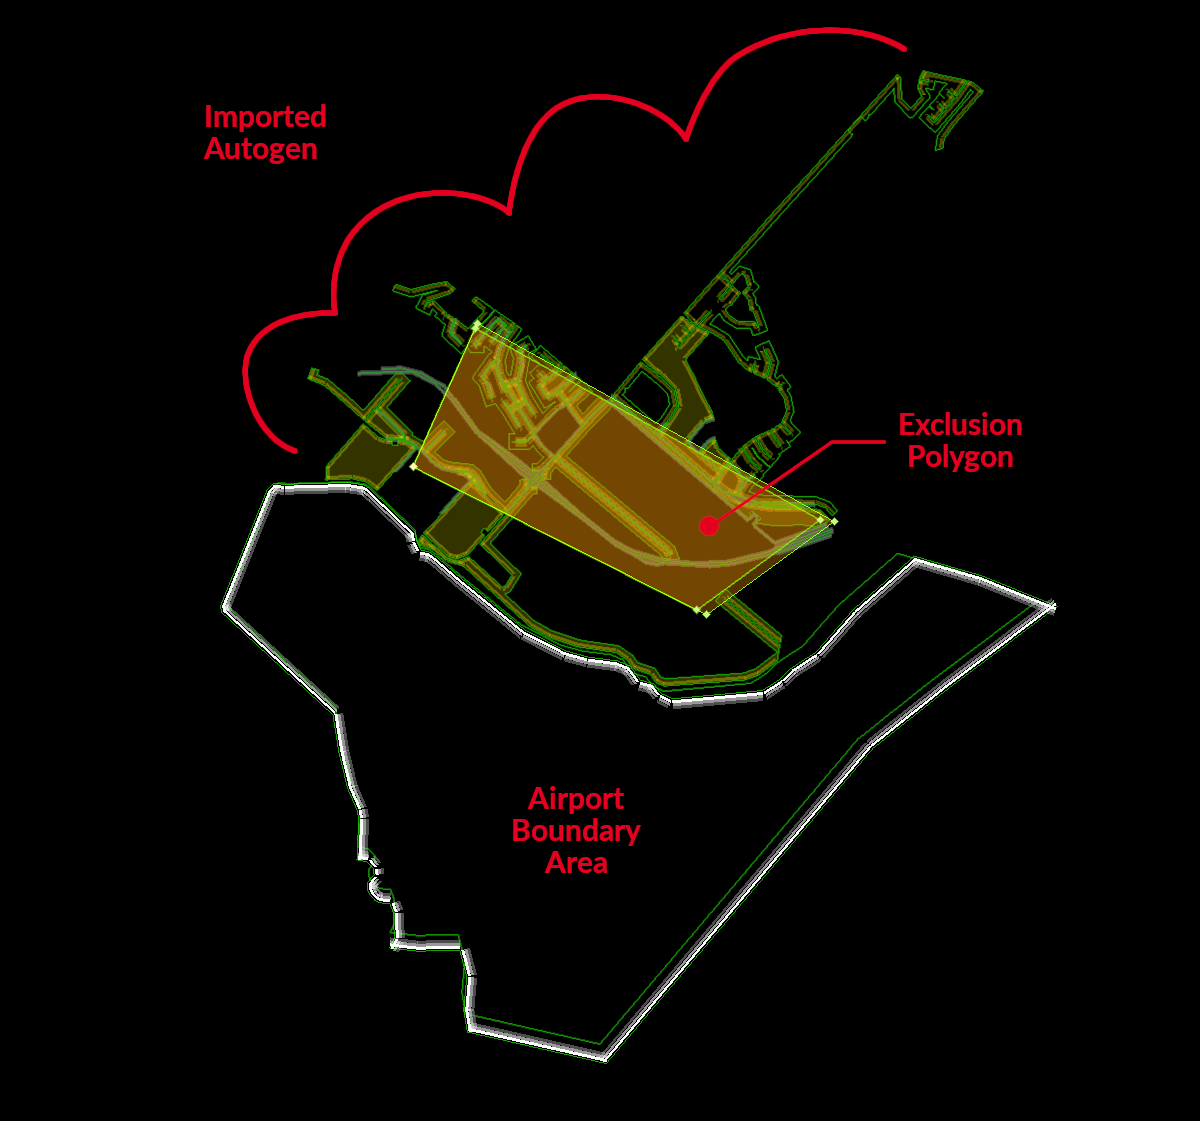
- Create a larger, temporary exclusion zone around a broad area of focus (e.g. as shown at right).
- Import its affected autogen elements into WED, so you can clearly see all the autogen member points.
- Create smaller exclusions around member points of areas/segments you actually want to exclude.
- Delete or disable the temporary exclusion zone (used for import only)
- Delete or disable all the imported autogen entities in WED so they are not re-exported back out.
The only reason you would keep an imported autogen entity visible for re-export, is if you modified the shape such that your version of it differs from X-Plane's version which you imported. In this scenario, your exclusion zone would remove X-Plane's default shape of the area, and your own custom version of it would then be exported from WED. This might be something you would do if you wanted to say, inject a single custom house OBJ in the middle of a string of autogen houses along a street, or modify the autogen roads.
In order to import an exclusion zone's affected autogen entities, your exclusion zones MUST be set to have roads excluded at minimum, or else the import command will be grayed out. Only the items you have enabled for exclusion on the zone will be imported; therefore, you generally want to enable all the elements to make sure you are seeing everything in WED.
With the exclusion area selected, execute the menu command: File > Import Roads (+ Autogen), and WED will import the autogen areas and segment chains affected by the Exclusion and display them in their own group in the hierarchy panel, which makes them very easy to turn on/off as a group. If you have multiple exclusion zones selected when you run the import command, then all the imported items will be put into one group and not "one group per exclusion zone selected".
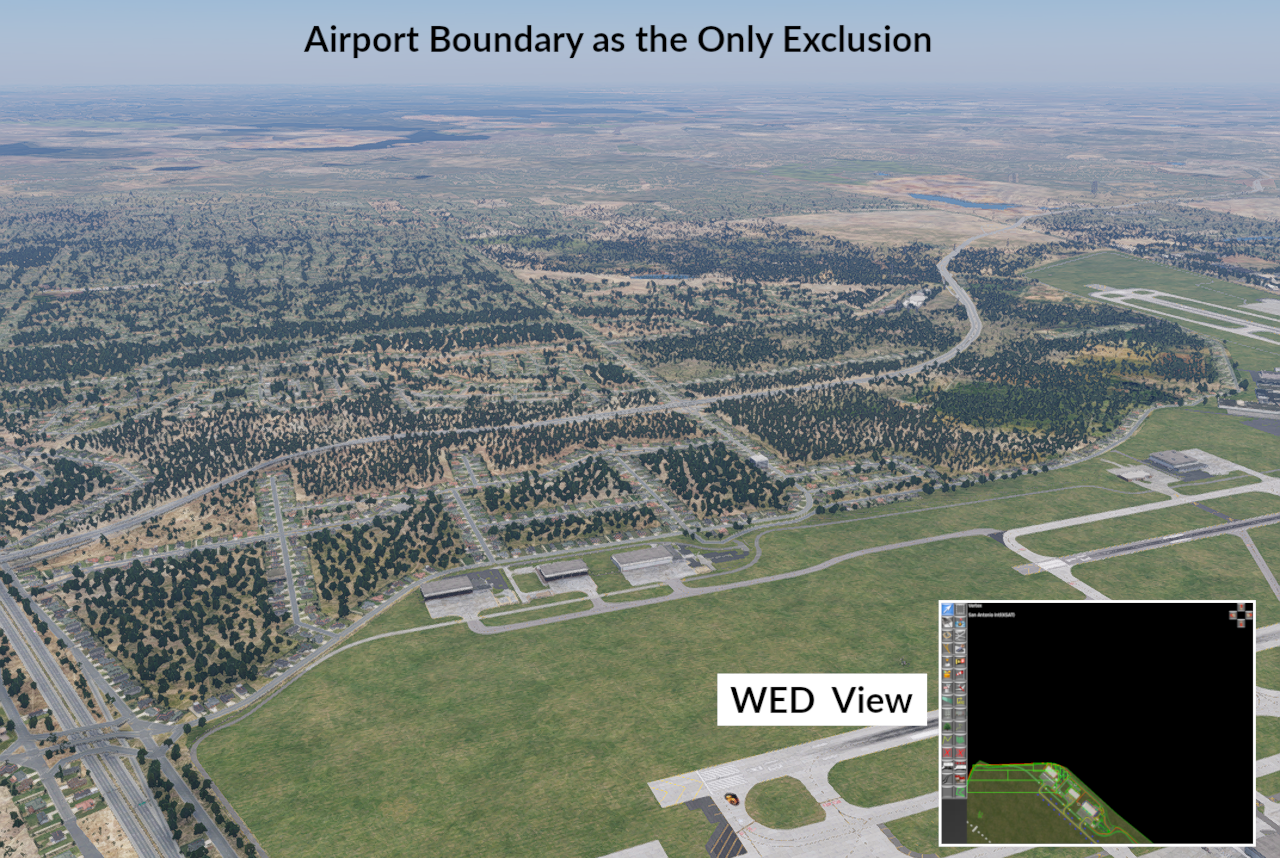
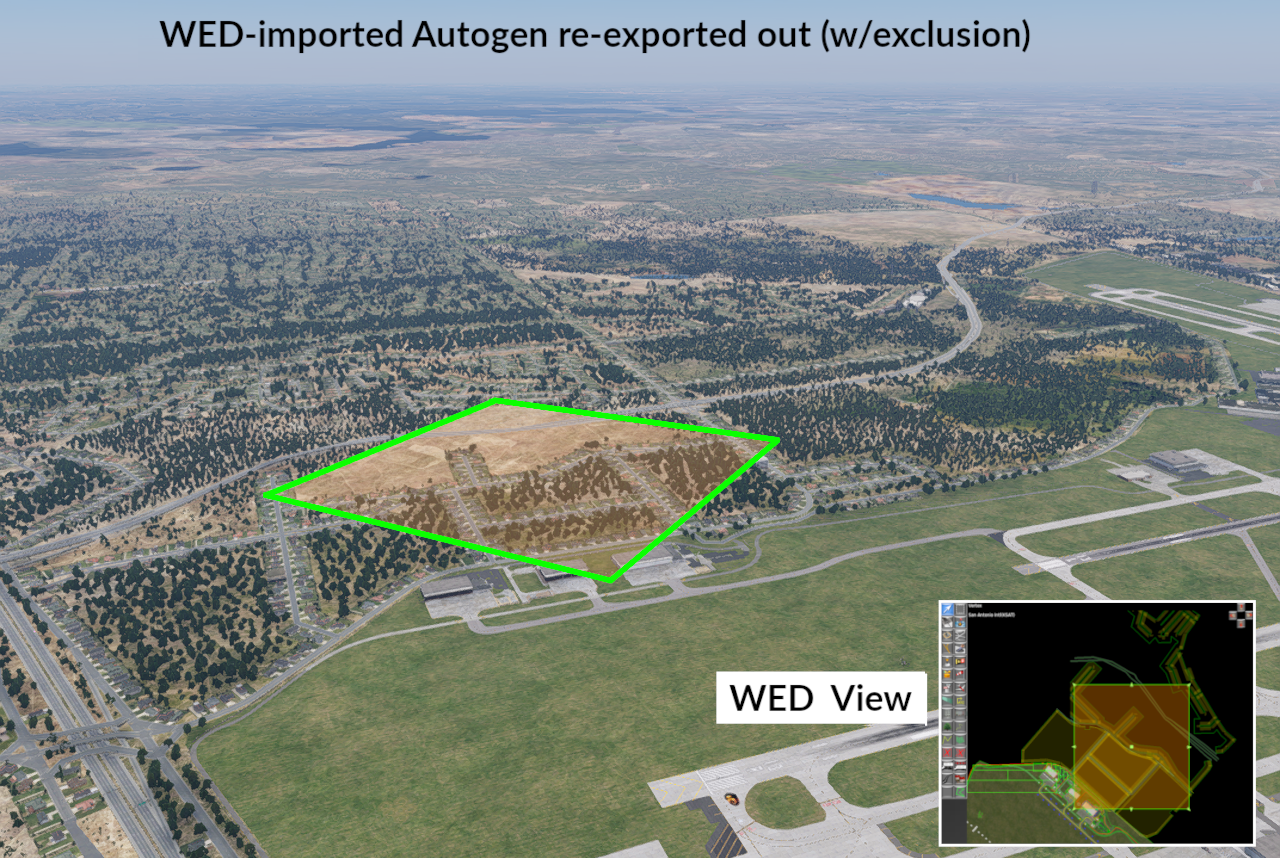
The image below illustrates the results of various exclusion workflows in WED. Click on the radio buttons to see the variations in the resulting autogen scenery based on the exclusion and imported entities in WED. Each image demonstrates a concept as follows:
- BASE Autogen. The nominal autogen for the region. The autogen exclusions comes from the airport boundary polygon alone.
- Import THEN Export. The autogen entities were imported into WED and then the scene was immediately exported back out with the autogen elements visible in WED. The exclusion zone in WED removed the autogen, but then the visible autogen shapes in WED put it right back, therefore the scenery is not much different than the BASE autogen version; however, you will note that forest region WAS affected by the exclusion. Because the autogen import command does not import forest polygons, there was no imported forest polygon in WED to put the trees back into X-Plane. To get the trees back in this example, you could either disable the forests option on the exclusion zone and it would not exclude the forest, or you could use WED's Forest Tool to create a forest polygon in the affected area.
- Exclusion Only. The imported autogen entities were turned off in WED, preventing them from exporting and the scene was exported with only the one exclusion polygons shown above. This image shows the autogen entites that were removed by that polygon, exactly what you imported into WED would be excluded.

Polygon Exclusions
Truth be told, there is no such thing as a polygonal exclusion to X-Plane, only rectangular. WED's polygon exclusion tool is a WED only tool whereby WED will auto-create exclusion rectangles for you behind the scenes during export. While this seems like a great thing, this tool CAN sometimes create an excessive number of exclusion rectangles trying to cover the area of the polygon. The polygon exclusion is one you should use sparingly, first preferring the Rectangle exclusion tool, then opting for the polygon tool for more targeted areas. We do note that if you fully understand how exclusions work by capturing nodes and not areas, then this tool is not really necessary. Importing autogen elements as a means to visualize what you want to exclude and where autogen nodes are is the superior workflow.
Excluding Custom Scenery
When custom scenery packages use exclusion zones, they will only exclude scenery below them in the custom scenery order. This means that if two authors create custom scenery for the same area and each have overlapping exclusion areas, then the scenery pack that is higher in the scenery_packs.ini order will be the exclusion rules that are implemented by X-Plane. See Custom Overlay Scenery Packages for more information about custom scenery draw order.